One major goal for the Breakroom blog is to answer the questions that we get from our customers every day. Since the launch of our VertDesk v3 frame one commonly asked question is, “How do I select the right size frame for a desk surface I own or am considering buying”. While the vast majority of our VertDesk v3 desks are sold with our laminate surface, we have customers who want something more custom. While this post is geared towards pairing a DIY surface with a VertDesk v3, most of the tips and suggestions will be true for competing brands.
Full Disclaimer: We are an office furniture dealer and sell some of the products we review. To learn more about the products we sell, our review process and why you can trust us, please visit: Why we’re different. Who is BTOD.com and The Breakroom Blog?
How To Build DIY Standing Desk Links
- Where to Find a DIY Desk Surface
- DIY Surface Material Types
- Hardware to Attach DIY Surface
- How to Select DIY Top and Frame Size
- Cost of Original Surface if DIY Option Fails
- How To Attach DIY Surface to Frame
1. Where to Find a DIY Desk Surface
Depending on where you live and how handy you are, the options for a DIY desk surface are wide open. If you like the surface on your existing desk there is always the opportunity to remove it from the desk and use it on your new adjustable frame. We’ve had customers use old doors, plywood materials and kitchen table surfaces.
If you are looking for a brand new surface, we would highly recommend taking a look at IKEA’s selection of tops. While their IKEA Bekant is less than desirable, they have a wide selection of surfaces to choose from. In fact, our old VertDesk v3’s bamboo top option came from the same factory in China as IKEA. Whether you are looking for solid wood, wood veneer or bamboo, most of their surfaces are relatively inexpensive. Alternative stores to check out are big box retailers like Home Depot and Lowes.
2. DIY Surface Material Type
One of the first things to consider when using a DIY surface for your standing desk is the material type. The options are really endless, but the material used must suit your specific needs. In a recent post we looked at some of the most popular options to see what is the most durable. Durability requirements will depend specifically on the individual and the type of work that will be done on the surface. If you plan to write on the surface, finding something that is smooth and hard enough to reduce writing marks will be important. If you are looking for something that is natural and beautiful, these products are generally less durable and that should be considered.
3. Hardware To Attach DIY Standing Desk Top
When you purchase a frame only option, most brands will include hardware for mounting a desk surface. Because this hardware was designed for that specific brand, you need to think about the length of the hardware and the thickness of the surface. Too many times we’ve heard customer’s think of this after the first screw has been inserted into the desk surface. Once you create a hole in the desk surface, it won’t be the same again. Patching a desk surface can work, but it creates an opportunity for further damage through water issues, chipping and/or peeling depending on the material type.
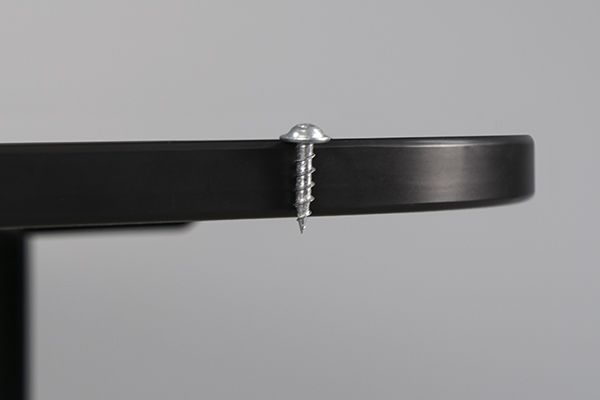
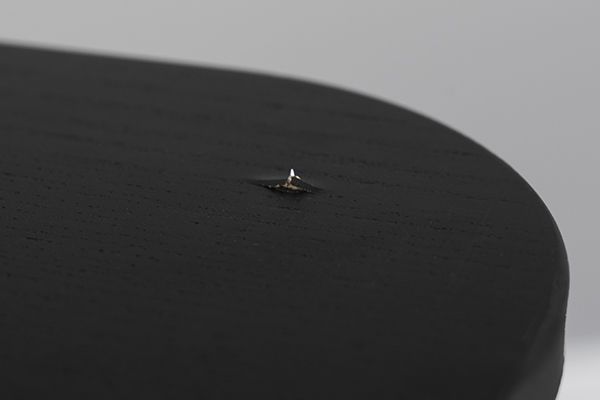
The all new VertDesk v3 frame packages include ⅝” long self-tapping wood screws for assembly. The surfaces that we typically pair with our frames are 1 ⅛” thick. The minimum thickness of a surface we recommend is ¾”. The length of our wood screws will work for most surface types at ¾”, but it’s important to be careful when using something this thin. Because of the thickness of the upper frame supports on the VertDesk v3, the screws won’t actually go a full ⅝” into the surface. Some materials run the risk of splitting the closer the tip of the screw gets to top of the surface.
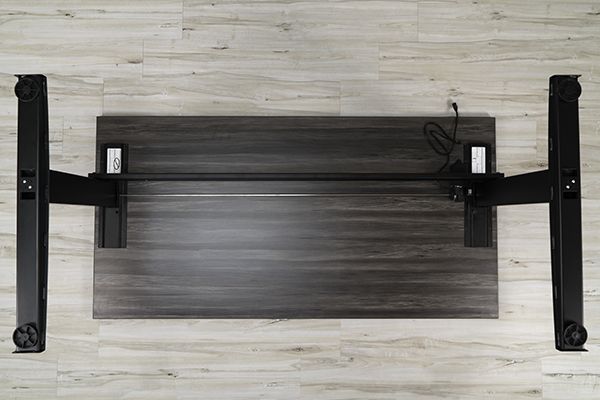
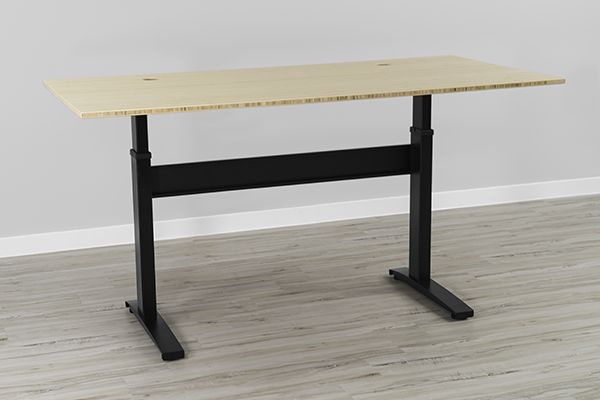
4. How To Select DIY Top Size and Frame Size
One of the most commonly asked questions by customers, pairing a surface with the VertDesk v3 frame, is to select to correct size for both base and top. To a certain extent, this comes down to personal preference. Of course, you need to make sure the surface size is at least as wide and as deep as the frame dimensions. To avoid splitting of surfaces, we recommend a small overhang of .5” on either side of the frame/surface.
VertDesk v3 Frame Size + Surface Min and Max Dimension Guide
| Frame Size (D x W) | Min. Depth | Max Depth | Min. Width | Max Width |
| 22.5” x 33.125” | 22.5” | 31” | 34” | 51.125” |
| 22.5” x 45.125” | 22.5” | 31” | 46” | 63.125” |
| 22.5” x 57.125” | 22.5” | 31” | 58” | 75.125” |
| 22.5” x 69.125” | 22.5” | 31” | 70” | 87.125 |
| 27.5” x 33.125” | 27.5” | 36” | 34” | 51.125” |
| 27.5” x 45.125” | 27.5” | 36” | 46” | 63.125” |
| 27.5” x 57.125” | 27.5” | 36” | 58” | 75.125” |
| 27.5” x 69.125” | 27.5” | 36” | 70” | 87.125 |
When you look at a VertDesk v3 frame, there are two different foot depth options available. The first is 22.5” deep and the second is 27.5” deep. The upper support for both of these depths is 15.5″ deep, so technically you can pair a desk surface that is at least 16″ deep with either of these depths. We always recommend that customers use a surface that is at least as deep as the foot length. This is good aesthetically and also minimizes the opportunity for tripping on the feet.
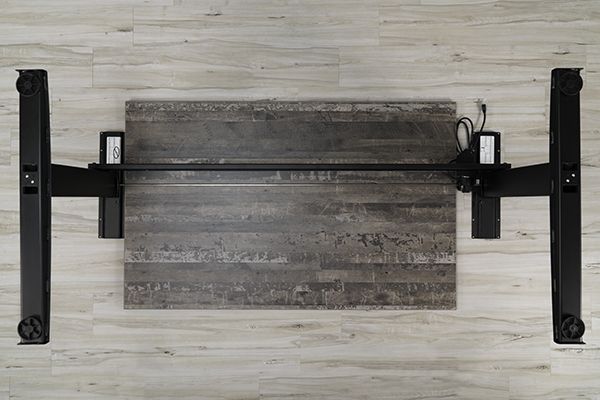
Looking at the width of the VertDesk frames, we have four different size options available. Because of the fixed cross support, the frame is not expandable. Because of stability issues with expandable cross supports, we have decided against that option. The four actual width options are: 33.125”, 45.125”, 57.125” and 69.125”. Our standard surfaces that we sell with the VertDesk v3 are 36”, 48”, 60” and 72” wide. While those are the standard sizes, we have created custom widths and recommended DIY surfaces outside these dimensions as well.
Let’s say that you have a desk surface that is 44” wide, what frame would be best paired? In this situation, we would recommend going down to the 33.125” wide frame. This means you will be left with a little over 5” overhang on either side of the frames legs. We have customers that are doing the same thing with larger frames and tops. A common size that has been asked about is 80” wide. Our 69.125” wide VertDesk frame is a good fit for that option. For the best experience with our frame, we don’t recommend more than 6” to 9” max overhang on either side of the frame. That means a 69.125” wide frame should use a surface width larger than 85”.
When pairing a surface that is wider than the frame it’s important to consider a couple things. The first is the strength of the actual surface being used. Between the legs of most frames, there are bars added to reduce bowing of a desk surface as it spans between the legs. When a surface overhangs from the edge of the frame, the support will only come from the desks surface. The further you extend past the leg, the more likely the surface is to bend. The second thing to consider is how a desks weight capacity comes into play. With most dual motor desks, manufacturers like to see the weight evenly distributed across the top. Overloading on one leg and/or binding in the columns can occur if too much weight is placed outside the legs. The binding issue is especially true for frames that do not include a traditional cross support.
5. Cost of Original Surface if DIY Option Fails
One of the biggest issues we’ve found with past customers attempting to go the DIY surface route is when the surface doesn’t work as planned. Whether a customer can’t source the surface of their dreams or it doesn’t come off the original desk, they end up wanting to buy a laminate surface from BTOD or a competitor. The biggest problem associated with this is the cost of selling just the surface. When shipped by itself, the desk surface can become expensive. It is always less expensive to ship the surface and the frame together. Keep this in mind before buying the frame on its own.
6. How To Attach DIY Surface to DIY Standing Desk Frame
Once you have a surface and a frame, the next obvious question is how to attach the two together properly. Most customers concern comes because of a lack of pre-drilled holes used to align the frame and surface together properly. While you can pre-drill holes into your surface with a drill bit, we don’t recommend it. There is always a cause for concern with customers drilling too far into the surface, creating a hole through the entire surface. The VertDesk v3’s hardware includes self-tapping wood screws, that when paired with a cordless drill, is easy to use.
The first thing I would recommend is that customers build the frame first. This makes that alignment of the frame and surface easier. Once the frame is completed, you can flip the surface and frame upside down. Our recommendation is to center the frame to the width of the surface. Doing this is fairly obvious, you want to use the same measurement inset of the surface on both sides.
Front to back is a bit more difficult with the VertDesk v3 since the desk frame is a C design. This means the upper supports are back of center, which doesn’t allow for an equal center mounted position front to back of the surface. For most setups, we like to have the foot back of center; this creates more room in the front of the desk for the user’s chair. A quick way to get the frame aligned to the surface is by pushing the top and frame up to a wall. You should be able to visually align the frame to the back edge of the surface with the use of a straight wall. If you have trim at the bottom of the wall, you can make those small adjustments.

Bottom Line
At the end of the day, pairing your own surface with a frame like the VertDesk v3 frame isn’t overly difficult. If you are handy, the process is pretty straight forward. Using the tips we mention above should make the project go a little smoother. This option is great for those that want something a little different than what most standing desk brands are offering.
Five Things To Consider
When pairing a DIY surface to a standing desk frame there are a lot of things to consider. If you’re going to make the commitment, we want to make sure you know what you’re getting into first. This is a great option for customers that want a custom look, but it isn’t for everyone. Below are the five things to consider when pairing a DIY surface to a VertDesk v3 frame.