When you get a new office chair it’s important to know all the different adjustments so you can customize the chair to your specific needs. Every office chair is different, so sometimes it can be tricky to understand what each lever or knob does and how to properly adjust different parts. If you’re using your chair and it’s causing you discomfort, you may not be using it properly. Knowing how to sit in and adjust your chair can make a world of a difference in your sitting experience. In this blog, we’ll tell you how to adjust the seat height, seat depth, backrest, lumbar, and headrests.
The different adjustments you can make on the Steelcase Leap v2 include: Seat height, seat depth, tilt angle, recline tension, lumbar height, lumbar tension, and armrest width, depth, and pivot.
Full Disclaimer: We are an office furniture dealer and sell some of the products we review. To learn more about the products we sell, our review process and why you can trust us, please visit: Why we’re different. Who is BTOD.com and The Learning Center?
Steelcase Leap v2 Adjustment Links
- Seat Height
- Seat Depth
- Tilt Angle
- Recline Tension
- Lumbar Height & Tension
- Armrest Height, Width, and Pivot
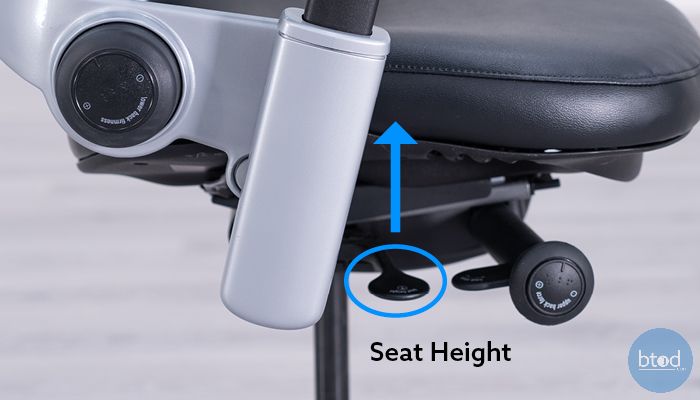
The most known office chair seat adjustment is seat height. To do this on the Leap v2, first locate the lever from the seated position on the right side of your chair. The height adjustment lever will be the furthest back of the two you see on that side. With your bodyweight on the chair seat, you can lower your chair height to the desired level by pulling up on the lever. To move your seat height up, take your body weight off the seat and pull up on the lever, which should allow your seat to rise. The proper ergonomic height will be at a level where you can sit with your feet flat on the ground and knees bent at a 90-degree angle.
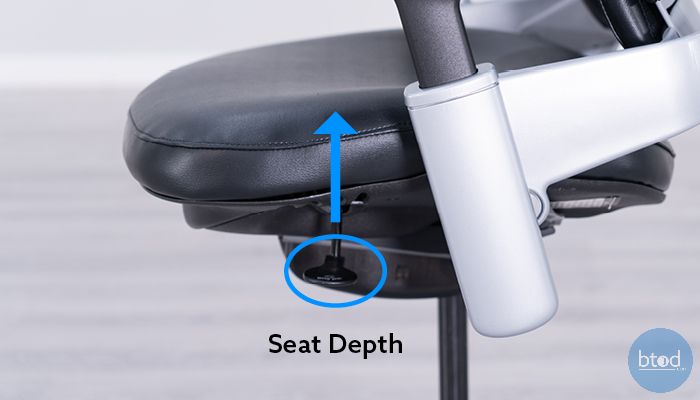
The seat depth is the measurement from the back of the chair to the front of the seat edge. This adjustment determines how far back you sit in your chair. To properly adjust your seat depth to fit you, pull up on the lever on the left side of your seat and slide the seat forward or back. The ideal position will be at least a one-inch gap between your knees and the front edge of the seat.
The back-tilt angle can be adjusted on this chair by flipping down the front, right side lever. There are five different position you can choose from that range between upright and reclined. Each stop on the lever designates the recline position you sit.
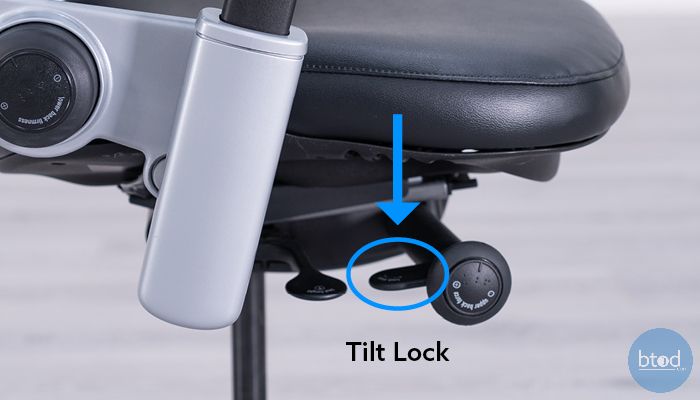

To adjust the recline tension in the back of your chair, twist the knob on the front right side of your seat. Turn it clockwise to tighten the recline and counterclockwise to loosen.
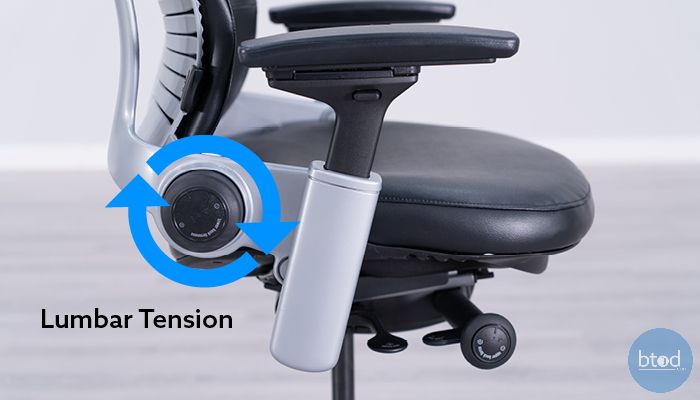
When adjusting lumbar support, you can slide the two handles located on the back of your chair up or down, so it fits comfortable with the curve of your lower back. To adjust the tension of your lumbar support, on the right side of your chair frame. Twisting clockwise will tighten the tension and counterclockwise will loosen the tension.
The Steelcase Leap v2 has a multitude of different armrest adjustments. When adjusting the arm height, push the buttons on the outside of the arm caps to raise or lower the arms. You will want the height adjusted so that your arms can rest at your sides with your elbows bent at a 90-degree angle.
To adjust the arm pad width and depth, simply just move the arm pad in, out, forward, or backward to your liking. The armrests on this chair, as well as many other Steelcase chairs, has a lot of range for arm movement, so finding a spot where your arms are comfortable usually is an easy task.
Final Thoughts
Now that you know how to properly adjust your Steelcase Leap v2 Office chair, you should be able to sit as ergonomically correct as possible. You’ll find great benefits in overall comfort from sitting correctly in your chair. If you have any questions about office chair adjustments or how to properly sit in your chair, don’t hesitate to reach out.