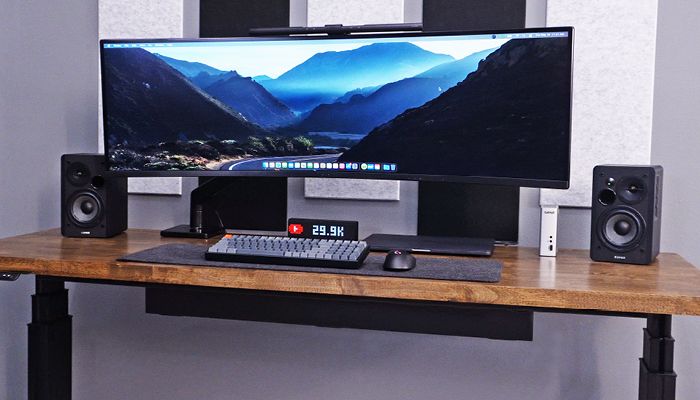
If you are anything like me, you are always trying to improve your desk setup, but even the nicest setup will look sloppy if the cables aren’t managed properly. Fortunately, for you, we have put together our top 5 tips that will help you manage your cables and create a neat and tidy workspace.
Full Disclaimer: We are an office furniture dealer and sell some of the products we review. To learn more about the products we sell, our review process and why you can trust us, please visit: Why we’re different. Who is BTOD.com and The Breakroom Blog?
How-to Fix Cable Management Links
- Make a Plan
- Determine Your Flexibility
- Find The Right Cable Length
- Organize Your Power Source
- Explore Products
1. Make a Plan
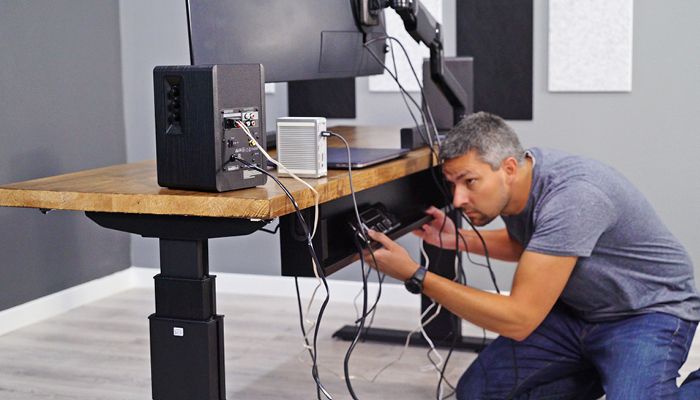
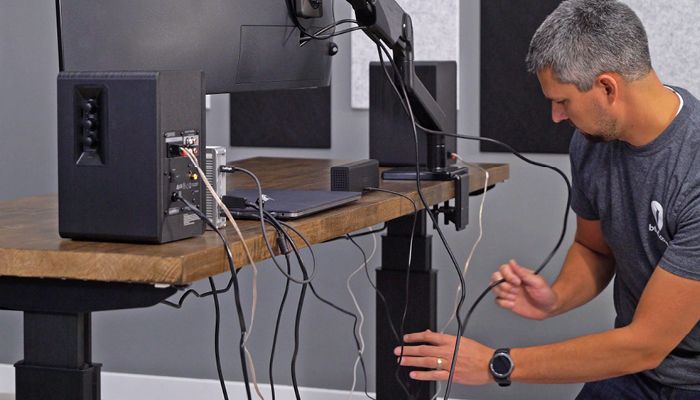
Personally, I have found that if you don’t start with a plan, you will probably end up redoing everything. That is why I suggest that you unplug everything and lay out all the items you plan to use on your desk. Decide where your desktop or laptop will go and position your monitor. Also, if you use a laptop, a docking station or a USB hub is an absolute must in my opinion. It’s the best way to simplify your cable situation.
Once you have decided on the placement of all your items, take a moment to figure out the best way to reattach everything and route your cables. Decide where your power strips, power boxes, and trays will go so that you can see whether your cables will reach. A little planning will ensure that you are able to fit everything that needs to go on or around your desk.
2. Determine Your Flexibility
Think about your working style and how your desk can better accommodate your habits. If you work from home or spend your days at the same desk at an office, you can manage your cables in a more permanent way. This can include drilling cable hooks to the underside of your desk or using adhesive strips that tightly secure cables. More permanent solutions will help you achieve a minimalist look that is clean and tight. Since you probably aren’t items like monitors with you, those cables can be tightly secured.
For those who work in more of a hybrid style where you might take a laptop or charger with you to different work locations or you are just constantly readjusting your workspace, then you will want to create a more flexible space. This might mean more items on the desk and fewer cords attached directly to the desk. You can still use hooks that will hold the cords in place without actually clamping them down. It all comes down to finding the right balance for your work situation.
Using a wire box is a solution that will fit almost any work style and situation. If you have a more permanent desk, a wire box will provide plenty of space to place all your wires. On the other hand, if you are frequently removing items, the box will also provide easy access so that you can quickly remove them as needed.
3. Find the Right Cable Length
Making sure that your cables are the perfect length will go a long way to improve the look and functionality of your desk. In some cases, you will need extra long cables so that you can properly route them. For monitor cables, you will need to make sure that they can reach your computer or hub after being routed around your monitor arm or any grommet holes. You will want a certain amount of slack in case you decide to change your desk configuration. When it comes to monitors, displays, and power cables, longer is better.
With USB cables for drives, devices, chargers, or even monitors light bars, aim for shorter cords. You want to avoid having excess wires laying on or hanging from your computer. This may mean purchasing the correct length cables to fill the specific need for each device. When shopping for cables, make sure that the specs match the OEM cable.
For the cord to the power strip, you want to make sure that you have enough length to reach from the top of your desk to the outlet. The right power strip can double as an extension cord so that you aren’t adding unnecessary vertical cords. If you have an adjustable height desk, make sure the cord is long enough to reach when the desk is at maximum height.
4. Organize Your Power Source
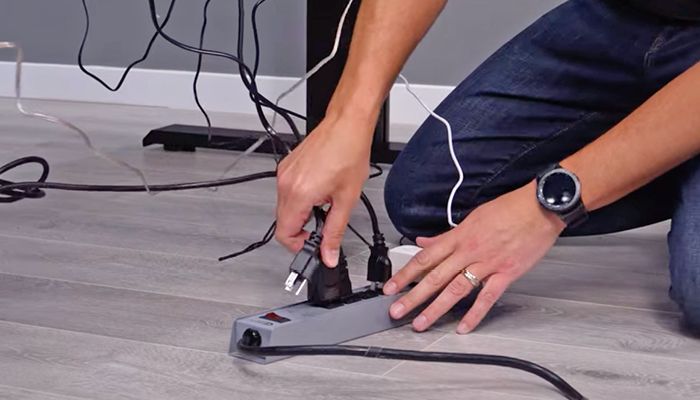
It is safe to assume that you will need one or two power strips depending on how large and complicated your desk setup is. From computers, speakers, lights, maybe even your desk, there can be a lot to plug in. Last time I checked my own setup, I had 14 different devices plugged into the power strips under my desk. So, when you are in the planning stage, make sure that you have enough outlets along with a couple free spots so that you have room if you need to plug something new. The extra spaces are also key for large plugs that end up covering multiple outlets.
With a wire management box or tray, you can place the power strips right inside. Another option is to use the holes on the ends of the power strip to drill it directly into the underside of the desk. Adhesive strips can also be used to secure the strip. Just be sure to use enough adhesive to handle the weight of the power strip. Also, some heavy plugs, like the Apple brick, will fall out if they are plugged in upside down.
5. Explore Products
As you look at different products to help manage your cables, keep in mind that you will be routing cables both horizontally and vertically. Personally, I have tried out every cord management method. In fact, at one point, I had a pegboard drilled into the back of my desk with the cords zip tied in place. While this worked, there are better ways, including cable raceways that provide a simple solution to horizontal routing. These raceways can either be screwed or glued to the desk and they are able to tightly secure a good amount of cords. Keep in mind that it is relatively easy to remove cords from these devices, but I wouldn’t recommend putting any cords in that you will need to remove frequently.
You can also explore clips that are specifically made to hold single or multiple cables. Personally, I like the strap style ties for permanent cords. They are great at keeping everything tight and they will last a long time. Silicon cable holders are also good for guiding cables in the right direction. They are good for more flexible work setups where you will be taking devices on the go, but I wouldn’t trust them to hold too tightly to cables and overtime, the adhesive can come loose if there is too much pressure on the holder.
Screw in cables offer another permanent solution for cable management. The downside is that they are only capable of fitting one small or medium sized cable.
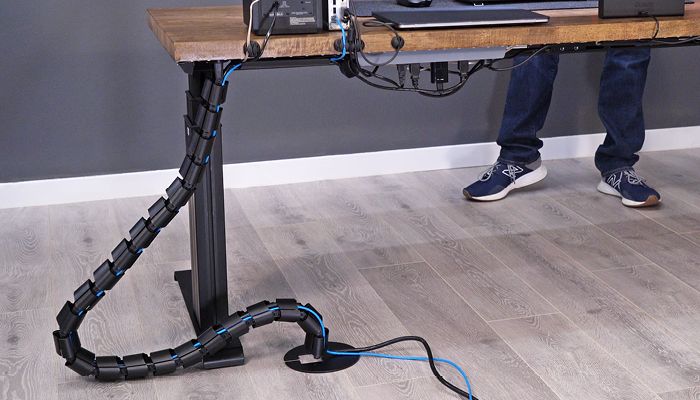
Once you have everything attached horizontally, it is time to tackle the vertical cables. For simple desk setups, you may only need one power cable running down from your desk. However, things can get complicated if you have several wires traveling vertically. For example, perhaps you have an ethernet cord or speaker wire. One solution is to use a cable sleeve that will give the appearance of one thick cable running down from the desk. If you have a standing desk, you can use a more substantial cable snake that will articulate as the desk moves up and down.
I have seen other even more minimalist solutions for hiding cords. Some people have installed a raceway down the wall or drilled holes in the wall to run the cords down the drywall. However, these are ultra permanent solutions so you will want to be absolutely sure that your desk will be in the same location indefinitely.
Bonus Tip: Think about the Safety of Your Devices
This is a lesson I had to learn the hard way. I had a cable that pulled a little too hard and my hard drive fell off and I lost some files. While modern SSDS can probably survive a fall, there are many devices that can be damaged just from falling a few feet. In fact, the cable connection is the most damage prone part of any electronic, so be careful about putting too much strain on any of the cables. Creating a tidy desk will help prevent cables from being tugged accidentally.
If you incorporate all of these tips into your workspace, you will have a cleaner desk that will help you be more productive.